|
SUGGESTED EXPEDITION EQUIPMENT
FOR BIGFOOTING
By Michael Killen
 There are many decisions to be made and many things to consider when planning a
Sasquatch/Bigfoot expedition. The first few decisions you must make before
leaving on any expedition will ultimately decide the type and amount of
equipment that will be needed while in the field. The first two choices to be
made are the most important, these are the choices of where and when you plan to
go. The area of operations for the expedition is probably the most critical
choice of all and will usually determine the overall success or failure of the
expedition. The chosen location should be an area with a past history of
multiple Sasquatch/Bigfoot encounters as well as some very recent or ongoing
activity to increase your chances of discovering any physical evidence of these
creatures in the search area. There are many decisions to be made and many things to consider when planning a
Sasquatch/Bigfoot expedition. The first few decisions you must make before
leaving on any expedition will ultimately decide the type and amount of
equipment that will be needed while in the field. The first two choices to be
made are the most important, these are the choices of where and when you plan to
go. The area of operations for the expedition is probably the most critical
choice of all and will usually determine the overall success or failure of the
expedition. The chosen location should be an area with a past history of
multiple Sasquatch/Bigfoot encounters as well as some very recent or ongoing
activity to increase your chances of discovering any physical evidence of these
creatures in the search area.
Depending on the climate of the area you will need to bring appropriate clothing
and camping equipment for the expected temperature variations during your stay
in the field. This is especially important if you are planning on camping
overnight for any length of time in the expedition area. Depending on the
location and time of year the overnight low temperature might drop as much as 20
– 30 degrees or more lower than the daytime high so you need to be prepared and
have some warmer clothing with you. Remember that it’s always better to dress in
several lighter layers instead of just one heavy layer. This way you can remove
some clothing during the heat of the day and add a layer or two at night if
needed for extra warmth. When the expected overnight low temperature will be
below 50 degrees it’s also a good idea to have a pair of gloves or mittens and
some type of hat or hooded jacket with you to be sure you are comfortable during
the night. You can always take some clothes off if you find that you are too
warm but if you are cold you can’t put more clothes on if you didn’t bring them
along. If you are planning on sleeping during the night, make sure to have a
tent and/or sleeping bag on hand, unless you can sleep in a nearby shelter or
vehicle. It’s also a good idea to bring a ground pad or thick blanket to use
underneath your sleeping bag or on top of the tent floor to further insulate
yourself from the cold and often damp ground.
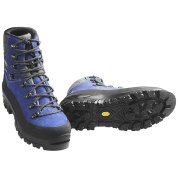 Of all the many different pieces of equipment and articles of clothing you
should bring with you, probably the most important item to have is proper
footwear. It’s an absolute necessity to have a good pair of comfortable shoes or
boots to hike around in as you explore the expedition area. They should be high
enough to provide good ankle support and well padded to ensure proper arch
support as you walk and climb in various types of terrain. They should also be
waterproof so your feet stay warm and dry while hiking, even in the mud or rain.
A poor choice of footwear will limit your search area if you find it
uncomfortable to walk for extended periods of time. You should always carry at
least one extra pair of socks with you just in case your socks do become wet so
you can change them and some type of raingear because the weather is often
unpredictable and subject to change without notice. A poncho or other type of
waterproof outerwear offers adequate upper body protection during a light or
short duration rain storm but won’t keep your legs dry. Many hikers prefer to
carry a poncho or light waterproof jacket over a full rain suit to save space
and weight in their pack but this isn’t always the best choice if rain is
expected. In a heavy or prolonged rain storm a full rain suit offers the best
protection and will keep your entire body dry but this protection comes at the
price of the extra weight and space it will take up in your pack. Of all the many different pieces of equipment and articles of clothing you
should bring with you, probably the most important item to have is proper
footwear. It’s an absolute necessity to have a good pair of comfortable shoes or
boots to hike around in as you explore the expedition area. They should be high
enough to provide good ankle support and well padded to ensure proper arch
support as you walk and climb in various types of terrain. They should also be
waterproof so your feet stay warm and dry while hiking, even in the mud or rain.
A poor choice of footwear will limit your search area if you find it
uncomfortable to walk for extended periods of time. You should always carry at
least one extra pair of socks with you just in case your socks do become wet so
you can change them and some type of raingear because the weather is often
unpredictable and subject to change without notice. A poncho or other type of
waterproof outerwear offers adequate upper body protection during a light or
short duration rain storm but won’t keep your legs dry. Many hikers prefer to
carry a poncho or light waterproof jacket over a full rain suit to save space
and weight in their pack but this isn’t always the best choice if rain is
expected. In a heavy or prolonged rain storm a full rain suit offers the best
protection and will keep your entire body dry but this protection comes at the
price of the extra weight and space it will take up in your pack.
 Your choices of clothing and sleep gear are all very important factors for your
personal comfort while in the field but even more important is the need for
first aid and safety equipment. Every single member of the expedition should
have their own personal safety equipment and first aid supplies. Proper clothing
and sleep gear are great to have but they can’t help you do things like navigate
through the wilderness, repel an aggressive bear or treat a minor wound or burn.
To do these things correctly you will need the proper equipment specifically
designed for each task. If there are bears active in the expedition area at the
time you plan to be there, be sure to have bear spray with you at all times. You
never know when you might encounter an aggressive bear and need to use the
spray. Snakes are another hazard you may encounter depending on the location and
time of year. If there is even a chance they might be active in the area during
your visit be sure to include a snake bite kit in your first aid supplies. In
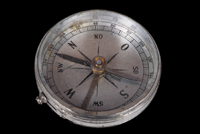
order to find your way from one point to another and back again in any area that
is completely unfamiliar to you, you will need to use a map along with a compass
or a GPS (Global Positioning Satellite) unit. This will allow you to navigate
safely without the fear of becoming lost in the wilderness. However, as part of
your personal safety equipment it’s always a good idea to carry a two-way radio,
loud whistle, mirror, flashlight or some other type of signaling device while in
the field so you can draw attention to yourself in the event you do become lost.
This will help others find you even if you don’t know where they are in relation
to your position. If you do become lost and have already signaled your position
to others do not move from your location. Once they have a fix on your position
they can come to you but they can only find you if you stay in the exact same
location you signaled from. GPS units are also a great help in recording the
exact location of a specific site so you can easily Your choices of clothing and sleep gear are all very important factors for your
personal comfort while in the field but even more important is the need for
first aid and safety equipment. Every single member of the expedition should
have their own personal safety equipment and first aid supplies. Proper clothing
and sleep gear are great to have but they can’t help you do things like navigate
through the wilderness, repel an aggressive bear or treat a minor wound or burn.
To do these things correctly you will need the proper equipment specifically
designed for each task. If there are bears active in the expedition area at the
time you plan to be there, be sure to have bear spray with you at all times. You
never know when you might encounter an aggressive bear and need to use the
spray. Snakes are another hazard you may encounter depending on the location and
time of year. If there is even a chance they might be active in the area during
your visit be sure to include a snake bite kit in your first aid supplies. In
order to find your way from one point to another and back again in any area that
is completely unfamiliar to you, you will need to use a map along with a compass
or a GPS (Global Positioning Satellite) unit. This will allow you to navigate
safely without the fear of becoming lost in the wilderness. However, as part of
your personal safety equipment it’s always a good idea to carry a two-way radio,
loud whistle, mirror, flashlight or some other type of signaling device while in
the field so you can draw attention to yourself in the event you do become lost.
This will help others find you even if you don’t know where they are in relation
to your position. If you do become lost and have already signaled your position
to others do not move from your location. Once they have a fix on your position
they can come to you but they can only find you if you stay in the exact same
location you signaled from. GPS units are also a great help in recording the
exact location of a specific site so you can easily
 return to this same spot.
You can also do this with a good TOPO map and compass using the surrounding
terrain features as landmarks but it’s much easier and more precise to create a
waypoint for the location in your GPS unit. This is especially useful if you
have discovered some type of physical evidence in an area and want to be able to
return there at another time to search again for more evidence. return to this same spot.
You can also do this with a good TOPO map and compass using the surrounding
terrain features as landmarks but it’s much easier and more precise to create a
waypoint for the location in your GPS unit. This is especially useful if you
have discovered some type of physical evidence in an area and want to be able to
return there at another time to search again for more evidence.
Speaking of physical evidence, you will need to have the right equipment to find
and collect any evidence that may be in the search area. You should consider
assembling your own “Evidence Collection Kit” and taking it with you on every
expedition. You never know what you might discover or when it will be found, you
may even happen across something completely by accident. This is why you should
be prepared to collect and save any type of physical evidence you may find at
all times. The evidence found could be a footprint, or a hair sample, or even a
scat pile so you will need different supplies in your “Evidence Collection Kit”
to properly save the evidence for detailed analysis later on.
At a minimum, the supplies in your kit should consist of, but not be limited to,
the following basic items:
Several pairs of examination gloves – to
carefully pick up and handle evidence
An assortment of different sized plastic bags – to store and transport the
evidence in
A pair of tweezers, needle-nose pliers or similar tool – to pick up smaller
items, single strands of hair
A magnifying glass – to help you find a small item, single strand of hair, or
closely examine track details
A soft bristle brush or can of compressed air – to gently remove debris inside a
track before casting
Track casting materials/supplies – cast mix, water, mixing can, stir sticks,
cardboard to form track molds
It’s up to you to decide what type of
casting material you will carry in your kit, there are quite a few different
types available. Some of the best and most popular are Dental Stone, Dry Stone,
Hydro Stone, Hydro Stone Super X, Hydrocal A-11, Hydrocal B-11, Ultracal 30, and
Ultracal 60. All of these are excellent choices for casting tracks and all are
much better choices than Plaster of Paris. Any of these materials will create a
track cast that is very strong yet impressionable enough to still show the fine
details of the track.
Other types of equipment are needed to help record the day to day activities
during your expedition and to help document any evidence that you find. Some
type of notebook or journal should be used to constantly update your progress
everyday. You should make note of the weather conditions, terrain features of
the area you search and any unusual events that may occur daily, no matter how
small or unimportant they may seem at the time. Sometimes you can’t see “the big
picture” at the time but it often becomes much clearer when you step back and
examine all the data collectively at a later date.
A camera and/or video camera will make it
easy to look back and review the exact details of the terrain in the surrounding
area. Both cameras are a great way to document any type of physical evidence you
find and they can also show the area where the evidence was found. Video cameras
can also be used to augment the written journal as another way to record the
activities of each day during the expedition. Using a video camera as you search
an area is a great idea because it records sounds as well as images. You never
know what sounds you might hear at any given moment and the video camera will
allow you to record them instantly. You don’t have to use a lot of tapes to do
this either. If nothing unusual happened during the search you can always just
rewind and record over the tape again at another time. You should also remember
to bring a spare set of batteries for each camera to be sure you will have use
of the cameras for the duration of the expedition. It’s also a good idea to have
a powerful handheld spotlight to help illuminate subjects or areas you may want
to film after dark.
To find signs of possible evidence from a
distance it’s helpful to have a good pair of binoculars or spotting scope as
part of your equipment. You may be able to spot things like tree breaks, rock
piles or territorial markers from a good distance away. Once you have identified
these signs you then have the option of going to the location for an on site
examination or continuing to observe the area for possible activity without
physically approaching it. With a lot of luck and patience this “stake out”
style of surveillance of an area with identified signs of activity might even
result in a not so close up sighting of the elusive giant.
 In the beginning of this article I mentioned that there were a few important
decisions that had to be made before going on any expedition. We have already
covered two of these, the choices of where and when to go. The third important
decision you must make is how long you plan to stay in the field. If you are
planning to stay more than twenty-four hours you will need ample supplies of
food and water to last for the duration of the expedition. You don’t have to
carry in any water if you are near a supply of fresh water and don’t mind
purifying it before you drink it, food however is another matter. Most of us
probably either couldn’t or wouldn’t want to live off the land if given the
choice between that and eating regular food. This means you must carry all the
food you will need with you, which along with all the other supplies and
equipment can make for a very heavy pack load. The longer you stay out the more
food you will need to carry so think lightweight foodstuffs to save on weight.
How long you decide to stay will also determine how big your duffel bag or
backpack needs to be to haul everything. Luckily there are so many choices of
different sized bags and backpacks available you shouldn’t have any trouble
finding the right one for your specific needs. In the beginning of this article I mentioned that there were a few important
decisions that had to be made before going on any expedition. We have already
covered two of these, the choices of where and when to go. The third important
decision you must make is how long you plan to stay in the field. If you are
planning to stay more than twenty-four hours you will need ample supplies of
food and water to last for the duration of the expedition. You don’t have to
carry in any water if you are near a supply of fresh water and don’t mind
purifying it before you drink it, food however is another matter. Most of us
probably either couldn’t or wouldn’t want to live off the land if given the
choice between that and eating regular food. This means you must carry all the
food you will need with you, which along with all the other supplies and
equipment can make for a very heavy pack load. The longer you stay out the more
food you will need to carry so think lightweight foodstuffs to save on weight.
How long you decide to stay will also determine how big your duffel bag or
backpack needs to be to haul everything. Luckily there are so many choices of
different sized bags and backpacks available you shouldn’t have any trouble
finding the right one for your specific needs.
All of the suggestions made here on the different types of equipment to take on
an expedition are just that, they are suggestions only. You may not agree with
everything I have said here and that’s fine. My only purpose for writing this
article is to give the novice Sasquatch/Bigfoot enthusiast a few helpful tips
and a quick explanation of what pieces of equipment might be needed on an
expedition, what they are each used for, and why it’s important to have them in
the field. If you are a novice enthusiast planning an expedition in the future I
hope this article was helpful to you in some way and I wish you good luck in
your search!
Here’s a few links to some lists that you
can use to help you develop your own camping and hiking gear checklist:
Adirondack Mountain Club
(Boston Chapter)
American Red
Cross Hiking and Camping Safety
Valley Outdoors Day Hike Checklist
Camper'sVillage.com
Backpacking Checklist
Great Outdoor Provision Co. Backpacker's Checklist
Kootenay
Mountaineering Equipment Lists
The photos appear here under the fair use
for educational purposes of copyright material.
|
1.jpg)